Templates are a great way to standardize and simplify the process of creating new orders in WorkRecords. Why Templates MatterTemplates act as pre-defined order confirmation “guides” for filling the same job repeatedly at a workplace. WorkRecords strongly encourages Labor Suppliers to use templates because they: - Save Time: Reduce the effort needed to input repetitive details for recurring positions.
- Reduce Errors: Minimize mistakes by using pre-set data.
- Ensure Consistency: Create uniformity across all users in your office.
How to Create a TemplateFor every position you staff, you will need to create a template. Start by gathering the following information: - Job Title: The name of the position being filled.
- Bill Rate/Pay Rate Information: Details about the rates associated with the position.
- Non-Hourly Billing Items: Include any additional charges, such as Special Billing Units (SBUs).
- Workplace Supervisor’s Email Address: Contact information for the workplace supervisor.
Tips for Multiple Positions at a Workplace- Same Rate, Multiple Positions: If several positions in a department share the same rate, you can use a generic job title like "Warehouse" or "Housekeeping."
- Different Rates, Different Positions: If positions have different rates, you’ll need separate templates. For example:
- Shipping/Receiving (Rate A)
- Picker/Packer (Rate B)
Taking a few minutes to organize this information will make creating templates faster and more efficient. Use the Excel spreadsheet attached to this training solution to organize your data and prepare for template creation. By investing time upfront to create templates, you’ll streamline the order confirmation process and enjoy the benefits of improved efficiency and accuracy.
CREATE THE TEMPLATE Once all your data is organized and ready, creating a template in WorkRecords is a quick and straightforward process, often taking just 3-5 minutes. Don’t be surprised by how simple it is!
WorkRecords emphasizes this step and dedicates time to training on it because completing templates correctly is essential for accuracy and consistency—not because the process itself is difficult. Get Started:You can either: - Follow the Detailed Steps: Read through the instructions provided below for a step-by-step guide.
- Watch the Video: If you prefer a visual walkthrough, watch a video demonstration of how to create a template below.
A. GENERAL NAVIGATION
After logging into WorkRecords at www.WorkRecords.com, you will be presented with a menu of actions. For this training, choose Orders > Create Templates.


Across the top of the screen, you will see the Order Wizard, a 6-step process going from left to right for creating a template. Step 1 - Select Selling Location Step 2 - Select Customer Step 3 - Setup Start Info (no longer needed) Step 4 - Select Job Title Step 5 - Setup Order (where the Template will be created and stored) Step 6 - Finish
At any time you should see the "Next Step" arrow and, where applicable, a "Previous Step" arrow. When one step is complete, click "Next Step" to advance.
Note: If, at any point in this process, you need to go back to a step to add/change information, click on Previous Step. Do NOT use your browser's Back button, as this may cause data errors.
As you go through the steps, you will notice a "Summary" box in the upper left-hand corner that will update as new selections are made. 
B. CREATING THE TEMPLATE
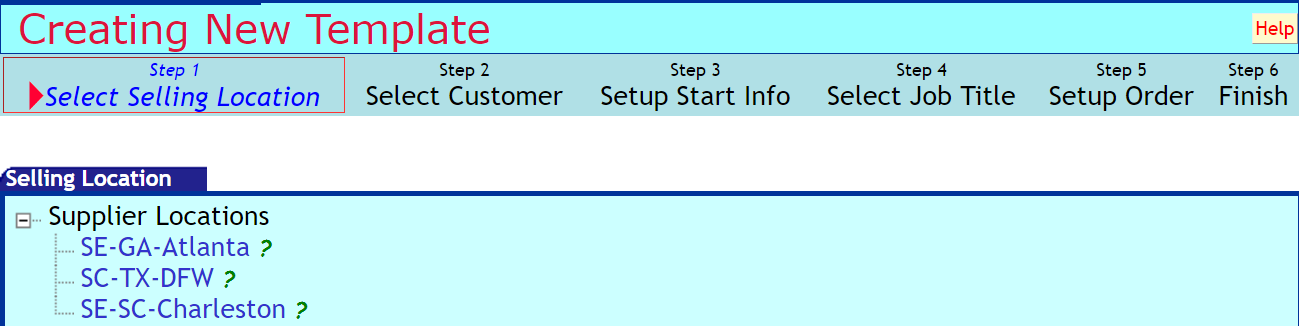
Step 1: Select Selling Location
Use the Supplier Locations tree to select the location from which this order is being sold. If necessary, click the plus (+) signs next to each level to find your selling location.
|  |
Step 2: Select Customer
Use the Customer tree to select the correct customer for this order. Click the plus (+) signs next to each level, if necessary, to select the appropriate work site. |
 | If the customer you are looking for is not available for selection (perhaps because the customer is new), please email support@workrecords.com. Once you select a customer, your choice will be populated in the Summary box in the top left corner of the screen.
| Step 3: Setup Start Info
Click on Next Step in the upper right corner, as this feature is currently inactive for new accounts.
| |
Step 4: Select Job Title
Select the correct job title for this template. Click the plus (+) sign next to each level, if necessary, to select the appropriate job title.
This job title is for your internal use, so choose the one that is meaningful to you as the Labor Supplier. The Labor Buyer has job activities that correspond with their reporting. Click here to learn more about job titles and job activities. |
 | Note: During Part One - Organizing your Data, you may have determined that more than one job title could be grouped together. In those instances, select the Job Title most commonly used. The other title will be added in the "Notes" section of the template.
| Step 5: Setup Order
|
| Enter your information in the fields as described below:- Projected Start Date: Enter any date as a placeholder (it is a required field); however, the date will not carry over to an order.
- Projected End Date: Enter any date as a placeholder (it is a required field); however, the date will not carry over to an order.
- Estimated Hours/Week: Enter the estimated workload; this is always an estimate—workers can work more/fewer hours.
- Hourly Bill Rate: Enter the rate you are billing your customer (must enter dollars and cents, i.e. 12.00).
- Hourly Pay Rate: Enter the rate you are paying your worker (must enter dollars and cents, i.e. 8.00); this field is optional and may not be turned on for your company.
- Burden: This explains how your company has set up the burden (extra cost) your company may incur above the pay rate (e.g., FICA, health insurance); you may or may not be able to edit this field.
|
 | - Shift Hourly Add Ons: (Optional) These are sometimes referred to as shift differentials. If there is additional bill/pay when a worker works shift 2, shift 3, etc., enter the additional amount here. Note: This is the additional amount (i.e. $0.50/hr) to bill/pay on top of the base Hourly Bill Rate or base Hourly Pay Rate.
| | - Overtime Rules: The configured OT bill/pay rates are revealed; edit the Bill Factor only if it is different than what the default amount reflects. Pay OT rules cannot be edited and are determined by state laws.
|  | - Additional Billing Items: Enter the bill and pay rates for additional billable items such as piecework, tips, bonuses, or even credits such as meal charges. Choose the available item(s) from the drop-down list, then add bill/pay rates as appropriate. As a best practice, WorkRecords recommends that you always include the MISC AddOn.
|  If your company has not set up additional billing items, the Additional Billing Items section will not appear on your screen. If your company has not set up additional billing items, the Additional Billing Items section will not appear on your screen. | - Customer PO/Req #: This is rarely populated on a template, but if the number will be the same for all orders, you can enter your client’s purchase order number here if you have it; this field is rarely used.
- Your Sales Order #: Enter your company’s sales rep ID or job ID here only if it does not change, you'll have a chance to populate this on the actual order; this field is optional and is only rarely used.
- Sales Tax: This field will default to your company’s tax rate for the customer you chose; this field may be editable.
|  - Notes: Enter any notes you want to submit to the Labor Buyer or communicate to a worker (if the worker has more than 1 active order). Typically this includes the description of the position or positions you are filling (e.g. Training, Housekeeper or Data Entry). These are revealed upon sign in if the worker has more than one active order at the customer. It is also used to note if this template is used for more than one job title.
| - Workplace Buyer's Primary Contact: Enter the corporate email address of the customer contact. The email address entered will need to be the email address of a manager that has a WorkRecords user account. More information regarding the Buyer Primary Contact email address is included under Step 6: Finish below.
- People Supplier’s Primary Contact: This defaults to the email address of the person creating the template, but can be typed over and a new email address can be entered. This is the email address that will be notified of TimeCard unapproval requests submitted by the Labor Buyer.
- People Supplier’s Secondary Contact: Enter the email address of anyone else at your company who needs to be notified, if desired.
|  | Step 6: Finish
Review your template carefully, as you will use the template to create future orders. The Order Info section shows you the order details that will be shared with your Labor Buyer once you start using the template. The Additional Info section shows you the order details that are confidential and only displayed to you as the Labor Supplier. Gross margin is calculated based on bill rate, pay rate, and burden %.
If any of this information needs to be changed, use the Previous Step button to return to prior steps and correct your choices. Do NOT use the Back button on your browser, as this may cause data errors.
Once you are satisfied with your template information, you must complete the following:
Outside Customer Information:
Check the check box to confirm the company name and the Buyer's Primary Contact. If this information is incorrect, use the Previous Step button to go back and correct it. | | NOTES:
WorkRecords looks at the email domain (the part after the @) to identify accounts. If you miskey a customer email address, WorkRecords will not recognize it. Thus it is critical that you confirm the buyer information here.
If your customer has a WorkRecords user account, this Buyer Confirmation will indicate so by displaying the company name in the yellow shaded area (and it will also provide you with the TimeClock Punch option, as shown in the step below). If you believe that they do have an account, but this box indicates they do not, please confirm that you entered the correct email address and click the Previous Step link to go back and correct it (be sure to double check there are no extra spaces at the beginning or end of the email address). The buyer may have 2 email addresses they use for email and only 1 is set up for their WorkRecords user account. Contact support@workrecords.com with any questions. |
|
| TimeCards Entered By:
Of the options listed, always choose TimeClock Punch unless specifically directed otherwise by a WorkRecords training manager.- TimeClock Punch: regardless of the method your worker is using to enter their time, you will choose TimeClock. If this option is not listed, please verify the email address for the Buyer's Primary Contact that you entered. Contact support@workrecords.com for additional assistance.
|  The other rarely used options are: The other rarely used options are:- Worker-option: Worker submits their time via an email submitted “honor system” timecard and doesn’t punch in.
- Buyer-option: a workplace manager enters the hours “in batch” each week.
| Template Name: You must enter a name for your template. Doing so will ensure you have a clickable hyperlink to use to create orders with this template. The template saves specific to a selling location and customer and reveals the pay and bill rates entered, so you do not need to include those in the name of your template. Choose a template name that will make sense to anyone in your office creating orders (e.g., Room Attendant or Painting/QC).
Click Save Template.
|  | CONGRATULATIONS - you have created your first Order Template!
To create another template, simply go back to Orders> Create Templates and start again. |
|